Best Windows 11 Backup Utilities
One of the most stressful things a person may go through is losing their data. Whether you’re a business or a home user, having backup software for all of your files, documents and data is critical; otherwise, you risk losing everything if your hard drive crashes or something goes wrong with the operating system. An ideal backup software makes it quick and straightforward to back up and restore your saved files and folders while providing sophisticated choices for better managing your data. This post will guide you on choosing the best Windows 11 backup utilities.
What Is Windows Backup Utility
The answer is yes if you’re asking if Windows 11 comes with backup choices out of the box. Backup options in Windows 11 include backing up to the cloud, backing up using file history, and utilizing the conventional backup and restore software found in earlier versions of Windows.
Backup and Restore is a Windows backup feature that enables users to create new and restore file backups or system images to recover data in the event of data corruption, drive failure, or virus infection.
Best Windows 11 Backup Utility Free Download in 2021
If you’re willing to accept a restricted feature set with fewer options, Windows’s built-in File History utility, along with Backup and Restore, should get the job done. However, suppose you’re looking for more professional and advanced tools. In that case, you might want to look at other third-party tools such as Paragon Backup and Recovery or AOMEI Backupper Standard. These third-party alternatives have many other helpful features and capabilities that may save you time and disk space. Here’s a simple chart comparing some of the best available options.
| Windows Backup | Paragon Backup and Recovery | AOMEI Backupper Standard | |
| Supported OS | Windows | Windows/macOS | Windows |
| Price | Free | Free/Paid | Free/Paid |
| Pros |
|
|
|
| Cons |
|
|
|
AOMEI Backupper Standard
AOMEI Backupper is a backup and restores software solution for Windows PCs that is suitable for both personal and commercial usage. It is a disc backup, restore, and cloning tool that also comes with a set of tools for managing disk images.
It works with all versions of Windows, from XP to Windows 10, and supports all common file systems, such as NTFS and FAT32. Full disk, partition-wise, and system-only backups are among the backup options. Backups can be scheduled and triggered by certain circumstances, such as system shutdown.
Features
- System Migration and Disk Cloning
- Anti Ransomware
- Files & Folders Synchronization
- Windows Server Backup, Clone, and Restore
How to Backup using AOMEI Backupper Standard
Using AOMEI’s Backupper Standard to create a backup is a simple process. Here’s how you can make it happen.
- Start by opening the application and navigating to the Backup section.
- Next, choose the kind of backup you’d like to proceed with. You get to choose from System Backup, Disk Backup, File Backup, and more.
- Now, choose the drive/file or partition to backup and the location to back it up to and click on Start Backup.
- That is all there is to it. The program will then start backing up the data.
Paragon Backup and Recovery
Paragon Backup and Recovery offers its users the option to customize their backups based on a variety of factors, including backup type, frequency, and retention. Users may also create scenario-based backups depending on their unique requirements.
As for its features, it has the majority of the tools one would need to save data and keep your backups up to date. There are options to create a WinPE bootable environment as an ISO image or a USB drive, which makes it simple to restore data if your operating system fails.
Features
- Backup and Schedule
- Disk Space Management
- Version Control
How to Backup using Paragon Backup and Recovery
Paragon Backup and Recovery makes it simple to manage your data at a glance and set up a regular backup routine. Here’s how you can take a new backup using the same.
- Bring up the Backup and Recovery application.
- Here, click on New Backup and choose the Backup Sources and Destination using the + icon available.
- You get a couple of options to go with. You can either back up the entire computer, the disk/volumes or the files and folders.
- Once done, tap on Backup Now, and you should be good to go.
If you’re looking for a simple backup and recovery option, go ahead with Windows’s offerings. However, if you’re an IT professional looking for backup options for your team, you might want to look at AOMEI Backupper for Windows or Paragon Backup and Recovery. Whatever you end up choosing, I’d recommend you do it as soon as possible. You do not want to risk your valuable data against malware, viruses, or even a simple OS crash.
How to Use Windows 11 Backup and Restore Utility
The Backup and Restore functionality introduced with Windows 7 makes its way to Windows 11. It was formerly accessible in Windows 8 but then was deleted with Windows 8.1 and later made available as a part of Windows 10 and 11. The Backup and Restore utility lets users restore old Windows 7 backups to a Windows 10 machine, although users can also use it to back up their Windows 10 PCs in a similar way.
This utility allows users to generate a backup of virtually everything on your disk quickly. However, there are some downsides too. Unlike File History, Backup and Restore are not capable of keeping previous versions of your data. Here’s how you can use the Windows 11 Backup and Restore utility.
- Get started with searching for Settings in the Start Search Box and choosing the best match to open the Settings application in Windows 11.

- Next, choose System from the left navigation pane and then select Storage.
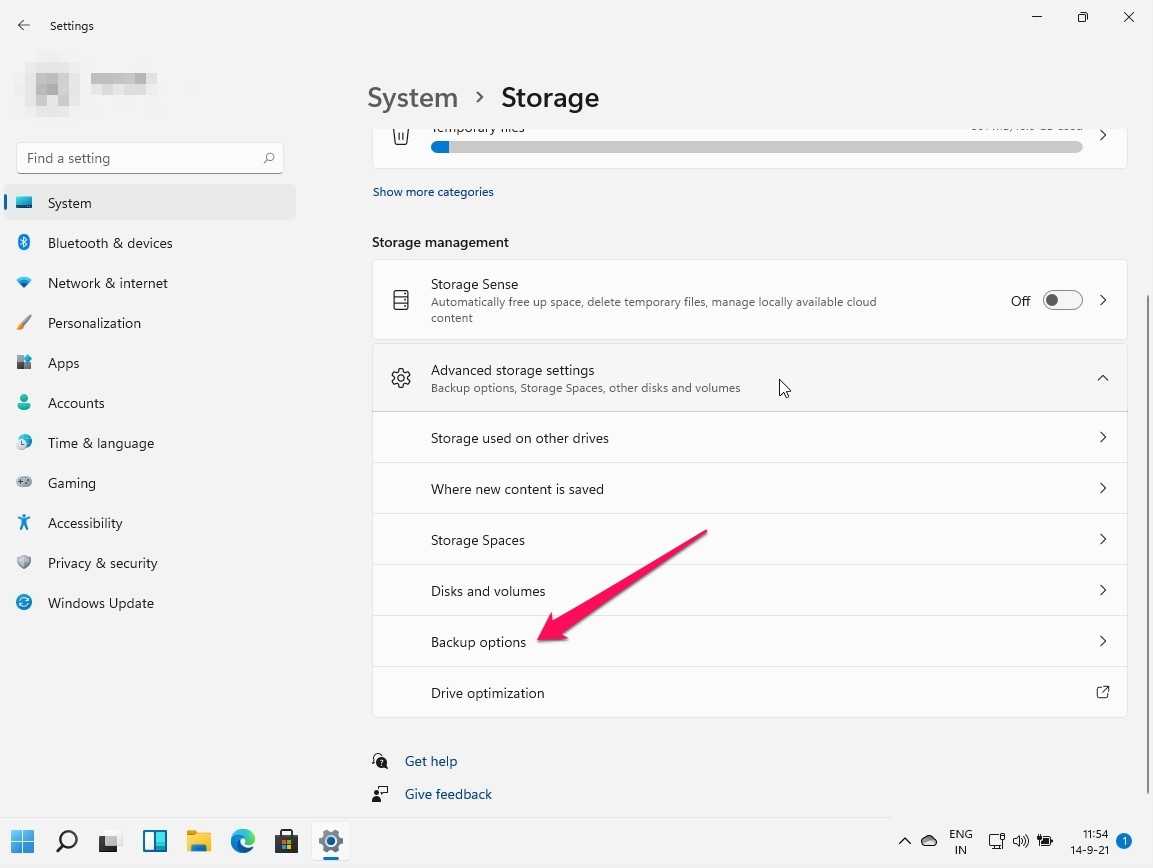
- Now, scroll down and tap on Advanced Storage Settings from under Storage Management.
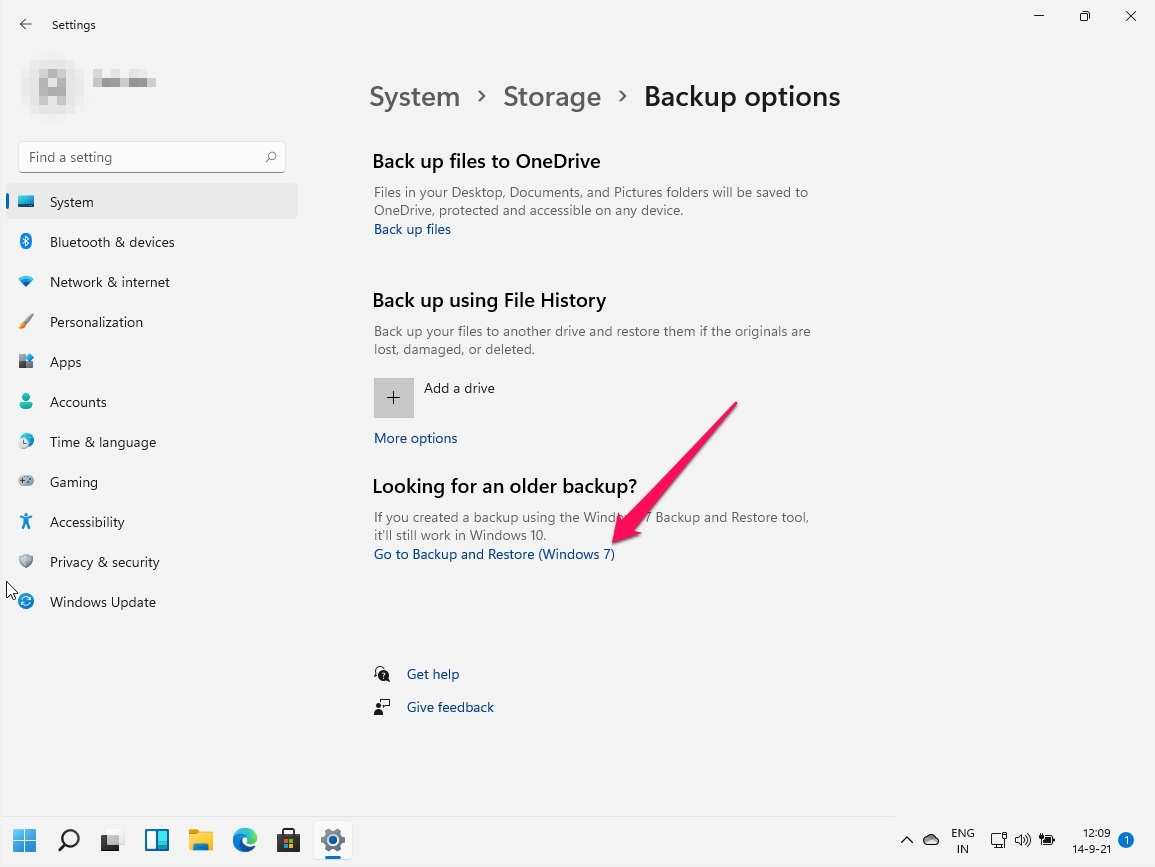
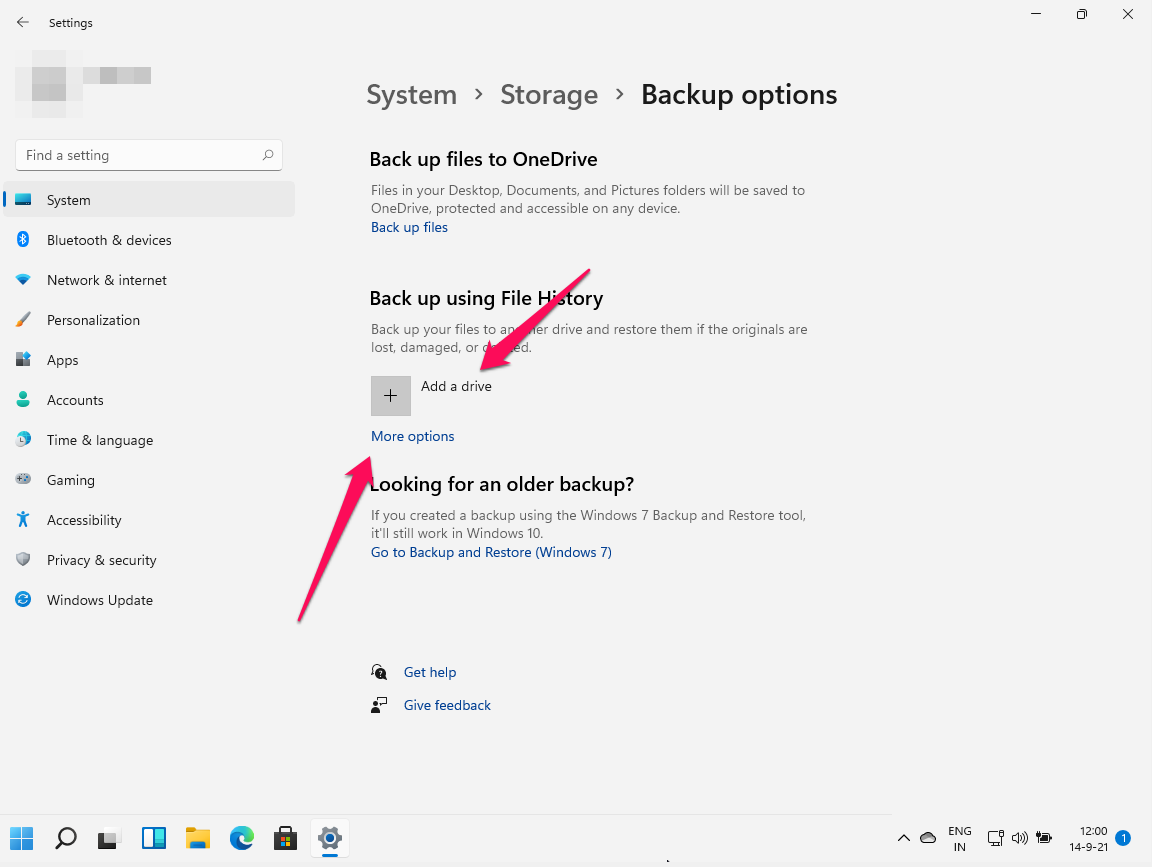
- Once again, scroll down, select Backup Options, and choose Go to Backup and Restore (Windows 7) under Looking for an older backup?

- This will take you to the Backup section of the Control Panel. Here, tap on Set up backup. Note that you will be required to log in as an administrator.
- Next, in the new Set up backup window, choose the Backup Destination by clicking on the drive to backup and selecting Next. Users can also choose to backup on a network by tapping on the option for the same. It is recommended that you connect an external drive and back up your files instead of the same physical disk as your system drive.
- Once you’ve selected the drive to backup to, Windows will present you with two options, either to let Windows choose the files to backup (which includes all the default Windows folders, the system image, libraries, and more) or to choose the files/folders to backup manually.
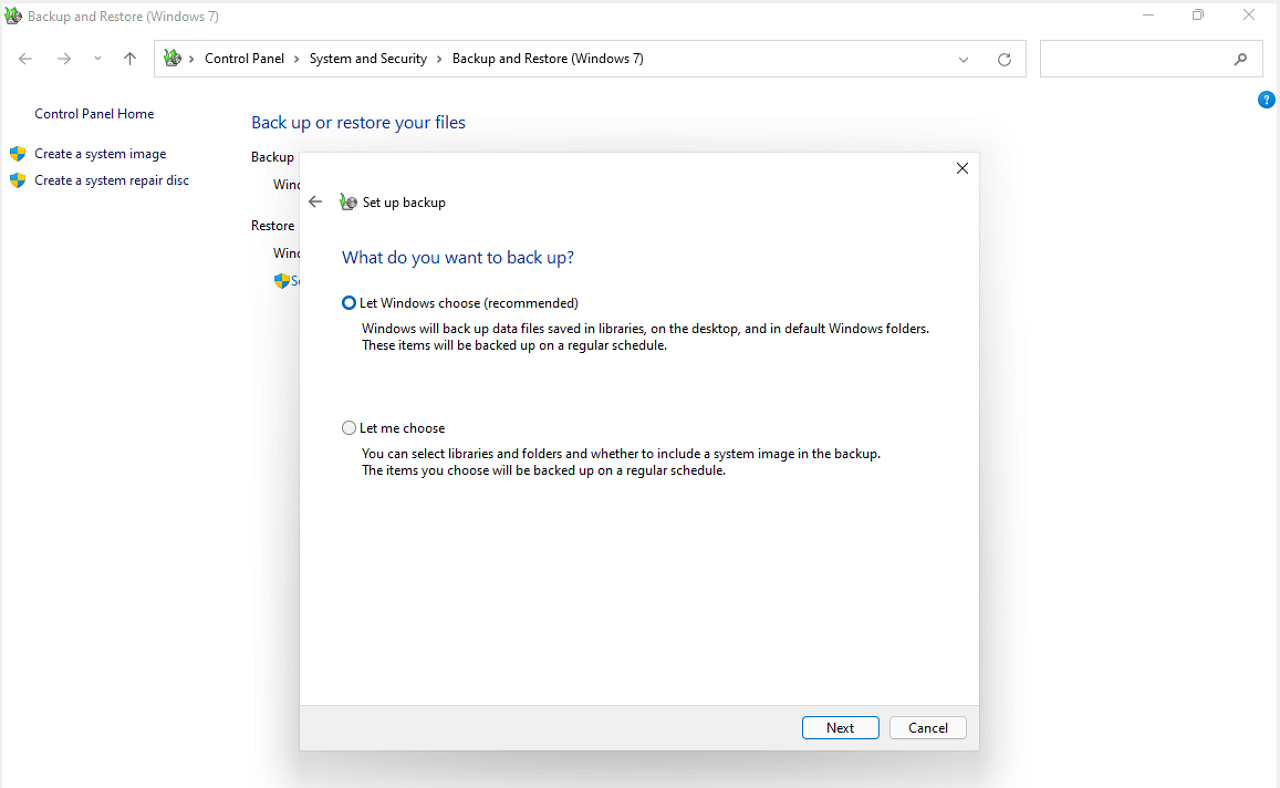

- If you do have some particular files or folders in mind, choose the second option. Else, you may go ahead with the first option, which Microsoft recommends.
- On the next screen, you’ll be asked to Review your backup settings, which includes the backup location, files to be backed up, and the schedule. Once checked, click on Save settings and run backup.
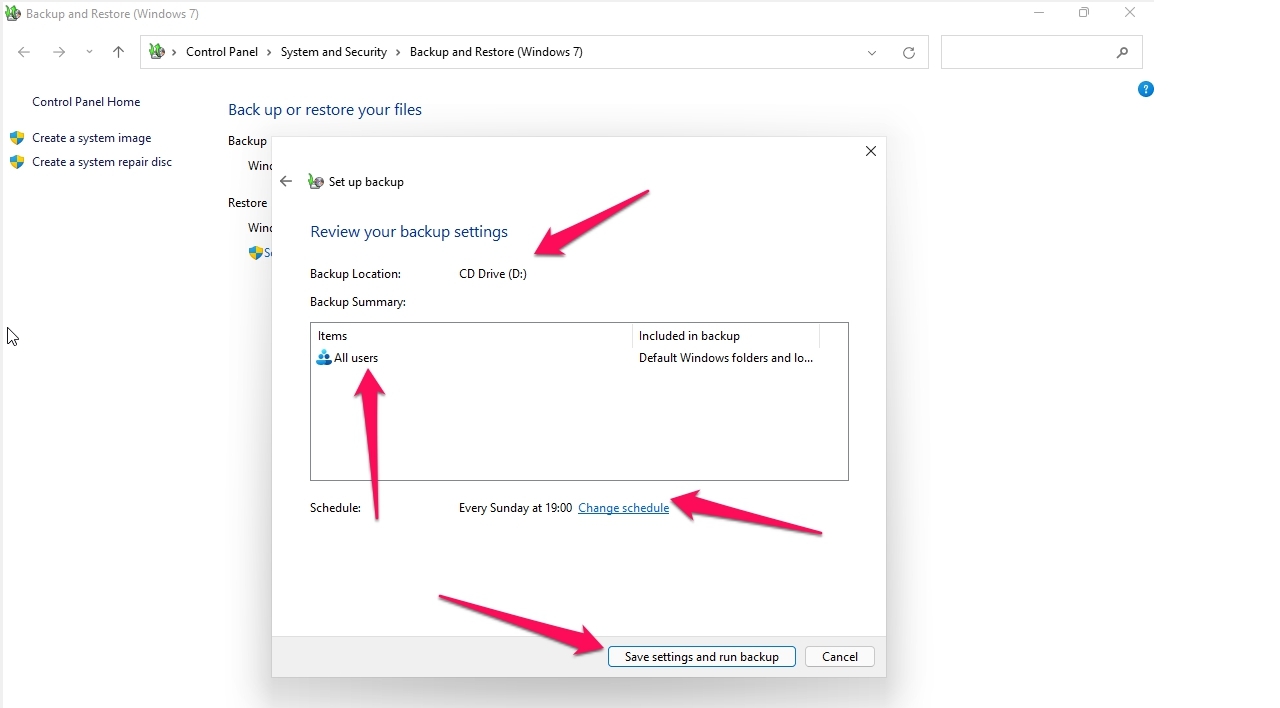

- You could also change the backup schedule by clicking on the Change schedule button next to it.
How to Use Windows 11 File History to Backup Files
The Windows 11 File History works differently than the standard backup options. It makes copies of your files as you work through them and saves them to an external hard drive or a home network. The utility accumulates a library of previous versions of your documents that you may retrieve if necessary over time. Your applications and programs are not backed up.
File History makes it extremely simple to recover your backups by allowing you to browse through different versions of your files. All you need to do to restore a file is just push a button. Here’s how you can back up your files and folders using Windows 11 File History.
- Start by opening the Settings application by either pressing Win + I on your keyboard as a shortcut or choosing the application from the Start menu.
- Navigate to System > Storage > scroll down and tap on Advanced Storage Settings from under Storage Management.
- Here, scroll down and select Backup Options.
- You should notice a section for Back up using File History. Next, choose to Add a Drive, and now you’ll be asked to select an external drive to back up the files. Once done, Windows will start backing up at regular intervals.

- You can turn off automatic backups by turning the toggle off for the same. Click on More Options under the same heading to change how Windows backs up or where it backs up.
- Here, you get to choose the backup intervals, time for how long to save the backed up files, identify the folders getting backed up, and more.
- Make the necessary changes and exit. That’s it.
Now that you know how Windows Backup and Restore, File History works, along with a couple of other third-party applications, go ahead and make your pick. You can keep your data safe and secure with these solutions to help you overcome any miserable data loss situation.